Create a 3D Floor Plan of an Interior Room Using RoomPlan
Creating a 3D floor plan is turning significant for many applications in augmented reality (AR), modern-day games, robotics, the E-commerce domain, and the real-estate sector. You can now craft a 3D model of a room, interact with and guide people to scan their physical environment using a device’s Lidar camera.
Some extremely unique applications and methodologies have been introduced focusing on diverse parts of crafting a 3D Floor Plan, such as explicit depth estimation, instance segmentation, 3D-based reconstruction, precise object detection, and much more.

Source:- https://developer.apple.com/documentation/roomplan
What is RoomPlan?
RoomPlan is a framework that helps you to make a 3D model of a room’s interior. It uses an ML model, the device’s sensors, and RealityKit’s rendering functionalities to identify and capture the physical objects of an interior room. Let’s take an example. To recognize walls, windows, entrances, and doors, the framework examines the device’s camera feed and LiDAR readings.
RoomPlan also can identify furniture, and appliances and provides detailed information to the applications.
We Have Used RoomPlan Framework For Our Application
We at Technostacks, a leading mobile app development company, have implemented the RoomPlan framework for our application called Room Planner.
The Room Planner is an interactive and intuitive application that enables you to create, customize, and visualize room layouts in a virtual environment. It enables you to explore various design options, experiment with furniture arrangements, and visualize how diverse components combine to produce a harmonious and purposeful space.
Thus, you can easily enable use cases like previewing a completely virtual space and furniture right from a catalog in a diversity of perfect styles, designs, and positions.
Read More:- Placing 3D Objects in Real-world and Enabling AR with SwiftUI
Significant Features of Room Planner App
Leveraging the Room Planner Application, you can easily bring surroundings into your app and interact with customers virtually. These scans can even be the foremost phases in architecture and interior design road maps to assist in streamlining different categories of project planning.
Let us explore the essential features and functionalities of the Room Planner Application.
- User-Friendly Interface
The Room Planner boasts a simple and easy-to-use interface that requires no technical expertise. You can effortlessly drag and drop furniture, walls, and other components to craft your looked-for layout.
- Extensive Furniture Library
This software comes equipped with an extensive library of furniture items, decor pieces, flooring options, and much more. So, you can better select from a varied range of best styles and offered designs to suit your precise preferences.
- Customization Options
Tailor the room to your liking by adjusting the dimensions of walls, doors, and windows. Additionally, you can modify the color schemes and textures to visualize the design more accurately.
- 3D Visualization
Experience your room design in stunning 3D, which offers a realistic and immersive perspective of your future space. This allows you to visualize the design from different angles and make informed decisions.
- Save and Share
Save your precise designs for future reference or easily share them with family and friends to get valuable feedback and opinions.
How to Use the Room Planner App?
Let us quickly explore how to use the room planner application.
Step 1: Launch the Room Planner application on your device.
Step 2: Start by capturing the room that you want to design.
Step 3: Start with customized options. Currently, we have put custom objects and textures. But
We can change it according to client requirements.
Step 4: View your design in 3D mode to get a realistic representation of your room.
Step 5: Save and share your designs as needed.
Key Benefits of Room Planner Application
The floor plans created by the room planner app can be applied directly in real estate and hospitality system applications that need an in-depth acquaintance of construction and a building’s explicit layout.
Visualize Your Ideas:
The Room Planner empowers you to see how different design ideas will look in reality, helping you make informed decisions about the room’s layout and decor.
Enhanced Collaboration:
Share your designs with family members or collaborators to gather valuable feedback and ensure everyone’s needs are met.
Flexibility:
Experiment with various layouts, furniture choices, and color schemes until you identify the ideal blend that aligns with your vision.
Technostacks Has Successfully Performed Room Planner Implementation For One of Our Clients
At Technostacks, our teams have successfully performed room planner implementation for a client. Let us describes the main view controller of the Room Capture app. The Room Capture app is designed to scan and capture room data using augmented reality (AR) technology.
The view controller manages the scanning process, better processes the captured room data, and provides options to export the captured room data in USDZ format. USDZ format here stands for zip-compressed Universal Scene Description leveraged to transfer rich 3D scenes and models.
To implement Room Planner in the application, first, we need to add camera permission in info.plist file

Dependencies
The Room Capture app uses the following dependencies:
- UIKit: The fundamental framework for building iOS apps.
- RoomPlan: A framework that provides functionality for capturing and processing room data.
- NVActivityIndicatorView: A library for showing loading indicators.
import UIKit
import RoomPlan
import NVActivityIndicatorView
Class Information
RoomCaptureViewController
This class is a subclass of UIViewController and serves as the main view controller for the Room Capture app. It implements the RoomCaptureViewDelegate and RoomCaptureSessionDelegate protocols to handle the AR room capturing and processing.
class RoomCaptureViewController: UViewController, RoonCaptureVienDelegate, RoomCaptureSessionDelegate {
Properties
- exportButton: An optional UIButton representing the button used for exporting the captured room data in USDZ format.
- activityIndicatorView: An optional NVActivityIndicatorView used for showing loading animations.
- BtnExport: An UIBarButtonItem representing the button used for exporting the captured room data.
- doneButton: An UIBarButtonItem representing the button used to mark the scanning process as complete.
- cancelButton: An UIBarButtonItem representing the button used to cancel the scanning process.
- activityIndicator: An optional UIActivityIndicatorView used for showing loading animations.
- isScanning: A Bool flag to track if the AR session is currently active (scanning) or not.
- roomCaptureView: A RoomCaptureView instance responsible for displaying the AR scene and managing the capture session.
- roomCaptureSessionConfig: A RoomCaptureSession.Configuration instance representing the configuration for the room capture session.
finalResults: An optional CapturedRoom object holding the final post-processed results after the room scanning is complete.
@IBOutlet var exportButton: UIButton?
@IBOutlet weak var activityIndicatorView: NVActivityIndicatorView!
@IBOutlet weak var BtnExport: UIBarButtonItem!
@IBOutlet var doneButton: UIBarButtonItem?
@IBOutlet var cancelButton: UIBarButtonItem?
@IBOutlet var activityIndicator: UIActivityIndicatorView?
private var isScanning: Bool false =
private var roomCaptureView: RoomCaptureView!
private var roomCaptureSessionConfig: RoomCaptureSession.Configuration = RoomCaptureSession.Configuration()
Main Methods
- startSession(): This private method starts the AR session for room capturing.
- stopSession(): This private method stops the AR session for room capturing.
- captureView(shouldPresent roomDataForProcessing: CapturedRoomData, error: Error?) -> Bool: This method is called when room data is captured and ready for processing. It returns a Bool value indicating whether the captured data should be processed.
- captureView(didPresent processedResult: CapturedRoom, error: Error?): This method is called when the post-processed room data is ready. It updates the finalResults property and enables the export button.
- doneScanning(_ sender: UIBarButtonItem): This method is called when the scanning process is marked as done or cancelled. It starts/stops the AR session accordingly and enables/disables the export button.
- cancelScanning(_ sender: UIBarButtonItem): This method is called when the scanning process is cancelled. It dismisses the view controller.
- ExportAction(_ sender: Any): This method is called when the user wants to export the captured room data. It exports the data to a temporary folder, presents a UIActivityViewController with export options, and shows loading animations.
- setCompleteNavBar(): This private method sets the navigation bar style when the scanning process is complete.
//Start AR session
private func startSession() {
isScanning true
roomCaptureView?.captureSession.run(configuration: roomCaptureSessionConfig)
}
setActiveNavBar()
//Stop AR session
private func stopSession() {
isScanning = false
roomCaptureView?.captureSession.stop()
setCompleteNavBar()
}
// Decide to post-process and show the final results. func captureView(should Present roomDataForProcessing: CapturedRoomData, error: Error?)-> Bool {
return true
}
// Access the final post-processed results.
func captureView(did Present processedResult: CapturedRoom, error: Error?) {
finalResults = processedResult
self.exportButton?.isEnabled = true }
self.activityIndicatorView?.stopAnimating()
//After the scanning process Done
@IBAction func doneScanning (sender: UIBarButtonItem) { if isScanning stopSession()} else { cancelScanning (sender) } BtnExport.isHidden = false
self.exportButton?.isEnabled = false
self.activityIndicatorView?.startAnimating()
}
For Generate customized Modal
Class Information, SceneDisplay
This class is a subclass of UIViewController and serves as the view controller for displaying the 3D scene using SceneKit. It provides methods to customize the scene by replacing objects and adding textures.
class SceneDisplay: UIViewController {
Properties
- sceneView: An SCNView representing the view where the 3D scene is displayed.
- Parametric: An array of SCNNode representing the nodes in the “Parametric_grp” group.
- objectGroup: An array of SCNNode representing the nodes in the “Object_grp” group inside “Parametric_grp”.
- ArchGroup: An array of SCNNode representing the nodes in the “Arch_grp” group inside “Parametric_grp”.
- Floor_grp: An array of SCNNode representing the nodes in the “Floor_grp” group inside “Parametric_grp”.
- ChairGroup: An array of SCNNode representing the nodes in the “Chair_grp” group inside “Object_grp”.
- StorageGroup: An array of SCNNode representing the nodes in the “Storage_grp” group inside “Object_grp”.
- TableGroup: An array of SCNNode representing the nodes in the “Table_grp” group inside “Object_grp”.
- activityIndicatorView: An NVActivityIndicatorView used for showing loading animations.
- exportButton: An optional UIButton representing the button used for exporting the scene in USDZ format.
@IBOutlet var sceneView: SCNView!
var Parametric = [SCNNode] ()
var objectGroup = [SCNNode](
var ArchGroup = [SCNNode] ()
var Floor_grp [SCNNode] () =
var ChairGroup = [SCNNode]()
var StorageGroup = [SCNNode]()
var TableGroup = [SCNNode]()
@IBOutlet weak var activityIndicatorView: NVActivity IndicatorView!
@IBOutlet var exportButton: UIButton?
Main Methods
getChildGroup(arrNode:[SCNNode], name:String) -> [SCNNode]: This function takes an array of SCNNode and a name as input and returns an array of SCNNode containing nodes with the specified name.
//Global function get child nodes array
func getChildGroup (arrNode: [SCNNode], name: String) -> [SCNNode]{
let array arrNode. filter term in
return term.name == name
}
return array
}
- StartTapped(_ sender: Any): This method is called when the “Start” button is tapped to initiate customization of the scene. It calls several helper methods to replace objects and add textures to different parts of the scene.
@IBAction func StartTapped(_ sender: Any) {
DispatchQueue.main.async { self.activityIndicatorView.startAnimating()
if let unwrappedNodes = self.sceneView.scene?.rootNode.childNodes[0].childNodes { self.Parametric = self.getChildGroup (arrNode: unwrappedNodes, name: "Parametric_grp")
if self.Parametric.count > 0{
self.objectGroup = self.getChildGroup (arrNode: self.Parametric[0].childNodes, name: "Object_grp")
self. ArchGroup = self.getChildGroup (arrNode: self.Parametric[0].childNodes, name: "Arch_grp") self. Floor_grp = self.getChildGroup (arrNode: self.Parametric[0].childNodes, name: "Floor_grp") if self.objectGroup.count > 0{
self.ChairGroup = self.getChildGroup (arrNode: self.objectGroup[0].childNodes, name: "Chair_grp") self.StorageGroup = self.getChildGroup (arrNode: self.objectGroup[0].childNodes, name: "Storage_grp") self.TableGroup = self.getChildGroup (arrNode: self.objectGroup[0].childNodes, name: "Table_grp") }
{
}
//Replace node or add texture methods
self.ReplaceChair (ChairGroup: self.ChairGroup) {
self.MakeTable (TableGroup: self.TableGroup) {
self.MakeWall (Group: self. ArchGroup) {
self.MakeFloor (Group: self.Floor_grp){
self.MakeStorage (Group: self.StorageGroup) {
DispatchQueue.main.asyncAfter (deadline: .now() + 0.5) self.activityIndicatorView.stopAnimating()
}
print("Done")
} } else {
// Handle the case when the array is nil
}
}
}
- ReplaceChair(ChairGroup:[SCNNode], withCompletion completion: () -> Void): This method replaces the chairs in the scene with a custom chair model loaded from a USDZ file.
//Replace chair with usdz file func ReplaceChair (ChairGroup: [SCNNode], with Completion completion: () -> Void ) {
if ChairGroup.count == 0{
completion()
return
}
for obj in ChairGroup[0].childNodes{
if let objectUrl= Bundle.main.url(forResource: "NewChair", withExtension: "usdz"),
let objectScene = try? SCNScene (url: objectUrl),
let objectNode = objectScene.rootNode.childNodes.first{
var node = objectNode.clone()
node.transform = obj.transform
node.simdPosition = simd_float3(x: obj.simd Position.x, y: -1.5, z: obj.simdPosition.z)
node.scale SCNVector3(x: 0.01, y: 0.01, z: 0.01)
obj.removeFromParentNode()
ChairGroup[0].addChildNode (node)
}
}
completion()
}
//Add texture on table
- MakeTable(TableGroup:[SCNNode], withCompletion completion: () -> Void): This method adds a texture to the tables in the scene.
//Add texture on table
func MakeTable (TableGroup: [SCNNode], withCompletion completion: () -> Void) {
if TableGroup.count == 0{
completion()
return
}
for obj in TableGroup[0].childNodes{
let box = SCNBox (width: 1.0, height: 1.0, length: 0.5, chamferRadius: 0)
let material = SCNMaterial()
let image = UIImage(named: "Table")
material.diffuse.contents = image
box.materials = [material]
obj.geometry box
let node = SCNNode (geometry: box)
}
completion()
}
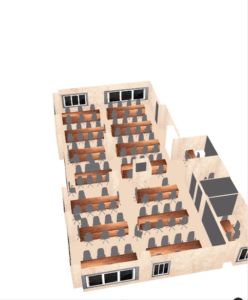
After the customization, you will get the final output like this:
- ExportTapped(_ sender: Any): This method is called when the “Export” button is tapped. It exports the scene in USDZ format
// exports USDZ and JSON file.
@IBAction func ExportTapped(_ sender: Any) { activityIndicatorView.startAnimating() guard let scene = sceneView.scene else { print("No scene available.")
return
}
do {
// Create a temporary directory to save the exported USDZ file.
let destination FolderURL = FileManager.default.temporaryDirectory.appending (path: "Export")
let destinationURL = destination FolderURL.appending (path: "Room.usdz")
let capturedRoomURL = destination FolderURL.appending (path: "Room.json") scene.write(to: destinationURL, options: nil, delegate: nil, progressHandler: nil) let activityVC = UIActivityViewController (activityItems: [destinationURL], applicationActivities: nil)
activityVC.modal PresentationStyle = .popover present (activityVC, animated: true, completion: nil)
if let popover activityVC. popoverPresentationController { activityIndicatorView.stopAnimating() popOver.sourceView = self.exportButton
}
} catch {
activityIndicatorView.stopAnimating()
print("Error exporting scene as USDZ: \(error.localizedDescription)")
}
}
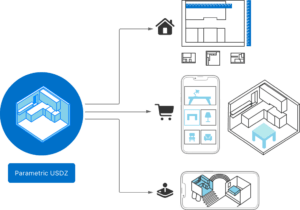
Diverse Use Cases of Room Planner Application
Different use cases of room planner application in architecture and interior design workflows for facilitating conceptual exploration and planning comprise:
- Interior design applications can precisely calculate the amount of paint needed to repaint a room.
- Architecture application allowing preview and edit alterations in a room’s layout on a real-time basis.
- Real estate applications can flawlessly facilitate agents to capture floor plans and 3D models for a quick listing.
- E-commerce applications can interact with customers using product-imagining features in their physical spaces.
Other prime use cases include previewing wall color alterations, estimating the size of specific areas of the room, blending a version of the room in an advanced 3D game, and make it simpler for your app to alter the scanned room’s distinct elements.
Conclusion
In this blog, we covered the details of the how to use RoomPlan to craft a 3D floor plan of an Interior Room. This capability can be applied in diverse business and technology fields of augmented reality (AR), robotics, E-commerce, games, and construction.
We covered related concepts in in-depth 3D Visualization, room layout estimation, and 3D object detection functionalities. We even showed how these functionalities can run effectively in terms of business and technology potentials on different application devices.
We also discussed how we at Technostacks have used this functionality and successfully implemented it on a real-time basis for clients. Connect with us to create such kinds of modern-day augmented reality apps or if you have an idea for something related.