


The Ultimate Guide For Scanning and Detecting 3D Objects With An iOS App
Let’s experience something new today – (AR)
Sometimes you might be having a thought that why cant you convert some of your thoughts into reality or visualize them at a time which are in trend, so for that i have an enormous material for you to learn….So without wasting the time let’s start!
Whenever you go on a tour or at some historical place there you will surely need a guide right? who can guide you properly regarding each role model or statue present there. Skip all this just download the mobile application for your ios in your phone or tablet, then place your device on any sculpture or art, after that just wait for the results in which you will get to see an interactive 3D picture in front of you which will work by recognizing the different parts present near you and then after it will get converted into the virtual content appearance.
Now comes the most important point to be noted
How does it works?
ou can run this application in IOS 12, it is totally based on ARKIT platform. The mobile application provides reference objects which converts three-dimensional features of known real-world objects, then after ARKit gives a signal responding to the application that when and where it may detect the similar authentic objects while performing an AR session.
You can collect different ways to use the object detection feature through this sample code project given:
- By using your mobile application you can scan an original object and that will come out in refernce object to detect that matter completely.
- You can save this data for further use by referring the ARObjectScanningConfiguration and ARReferenceObject device as part of your own asset production pipeline.
- By using detectionobjects property in a world-tracking AR session you can create reference objects for detection.
Scan Real-World Objects with an iOS App
The varied steps for scanning and defining a reference object suitable by ARKit platform for detection are quite simple. (Firstly Create a Reference Object in an AR Session as mentioned below) Next comes your devotion towards the reference object you create and the victory behind it in while detecting the object in you mobile app. Get your ios device ready for running this application which will result into the supreme quality data scanning and the files which you can use for detection.
Note
To make your work easy always go for top act ios device which scans the object quickly, the process of detecting the scanned objects can be done through any ARKit-supported device, but the foremost point matters is the tremendous character scanning which can be done peacefully on terrific device.
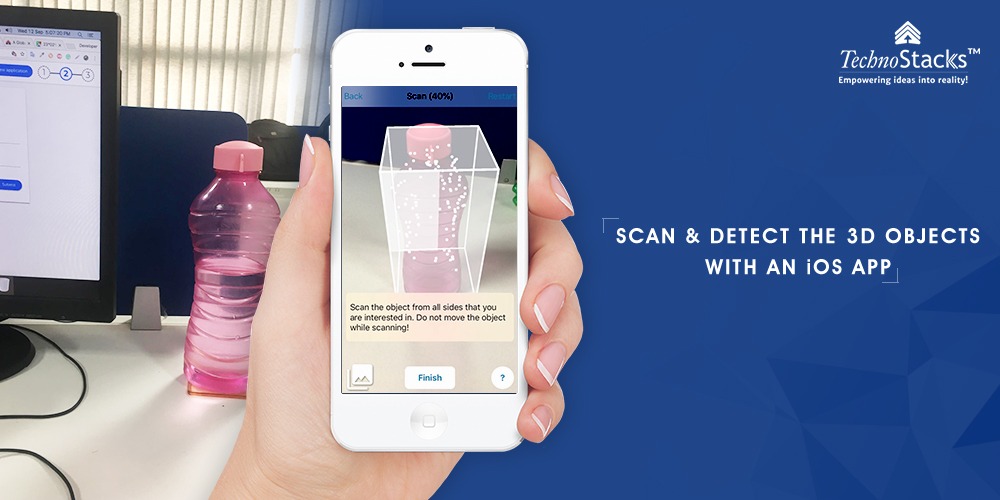
- Ready For Scanning – Start the application, place the physical object on the clean surface free of other things so that it gets centered in the camera view, a box appears exact on the object which roughly estimates the size, then move forward by tapping the next button.
- What is Bounding Box – A box which is used for capturing the object in 3D and then after by holding its sides you can resize it. Also keep in mind that you have to scan only the features related to the object not from outside the box. Move forward to scan button.
- Scan the object – Keep moving in varied directions targeting the object until the bounding box highlights the part you already scanned, Dont skip a single direction while scanning the object as it will help the users to recognize the object easily. After the scanning process completion the app will move forward to next step by its own.
- Modifying The Origin – You might see the X, Y and Z coordinate axis lines near the object’s anchor point. Just drag those circles axis relating the origin mutually in context to the object. If you want to visualize the 3D model in USDZ format the just add (+) button to it. If you are going in perfect manner then a model will get displayed by the application in front of you but after the perfect detection of real-world object is completed by AR, including the similar size of the model for adjusting the scale of reference object. Move forward to Test button!
- Test It And Export It – Finally the ARReferenceObject is visible now from the application but with a session of reconfiguration of detecting it. Using your sight skills just observe the the physical – world object from different directions and positions adding to varied environment places and placing in bulk lighting options just to get a surety that ARKit perfectly recognizes its position and does orientation. Move forward onto export button to get the sheet finished by saving it. Through this procedure you can easily export the sheet to you development Mac using AirDrop, or else you can send it to the files app for getting saved in icloud Drive.
Note
An ARReferenceObject contains the featured information that is necessary for ARKit to recognize the real-world object, and never displays a 3D reconstruction of that object.
Detect The Reference Objects in AR Experience
Use a Xcode asset catalog for scanning the objects in the particular application for the detection purpose:
- For adding a new AR resource group in the asset catalog just click the (+) button
- Move .arobject files from the existing platform into the newly created resource group.
- Optionally – For each reference object, use the inspector to provide a descriptive name for your own use.
Note
Place all the objects in the same session of your choice and comfort into a resource group, and use separate resource groups to hold sets of objects to be used in separate sessions.
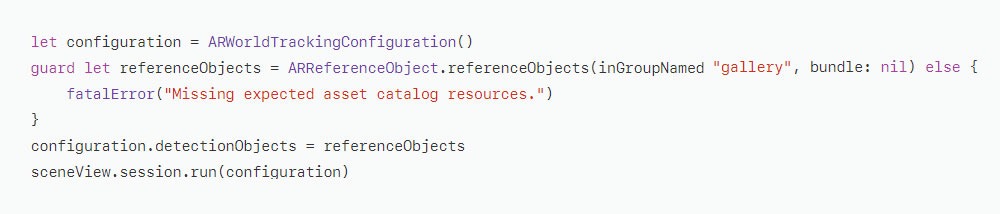
To enable object detection in an AR session, load the reference objects you want to detect as ARReferenceObject instances, provide those objects for the detectionObjects property of an ARWorldTrackingConfiguration, and run an ARSession with that configuration:
When ARKit detects one of your reference objects, the session automatically adds a corresponding ARObjectAnchor to its list of anchors. To respond to an object being recognized, implement an appropriate ARSessionDelegate, ARSCNViewDelegate, or ARSKViewDelegate method that reports the new anchor being added to the session. For example, in a SceneKit-based app you can implement renderer(_:didAdd:for:) to add a 3D asset to the scene, automatically matching the position and orientation of the anchor:

Here are the following points to be kept in mind for getting the top results while the object scanning and detection:
- While scanning the object ARKit always prefers for the clear surface and stable visibilty, apart from this the textured objects give the supreme result in comparision to plain or reflective objects.
- The scanning and detection process is suitable only for the objects which are adjustable meet the required purpose.
- The object to be detected should be of same structure as per the reference object. For obtaining the perfect shape always go for harsh objects while detection.
- To make your detection proccess more familiar just use the Consistent indoor alluring lighting that works best with the original object scanned.
Create a Reference Object in an AR Session
This sample app provides one way to create reference objects. You can also scan reference objects in your own app—for example, to build asset management tools for defining AR content that goes into other apps you create.
A reference object encodes a slice of the internal spatial-mapping data that ARKit uses to track a device’s position and orientation. To enable the high-quality data collection required for object scanning, run a session with ARObjectScanningConfiguration:

During your object-scanning AR session, scan the object from various angles to make sure you collect enough spatial data to recognize it. (If you’re building your own object-scanning tools, help users walk through the same steps this sample app provides.)
After scanning, call createReferenceObject(transform:center:extent:completionHandler:)to produce an ARReferenceObject from a region of the user environment mapped by the session:
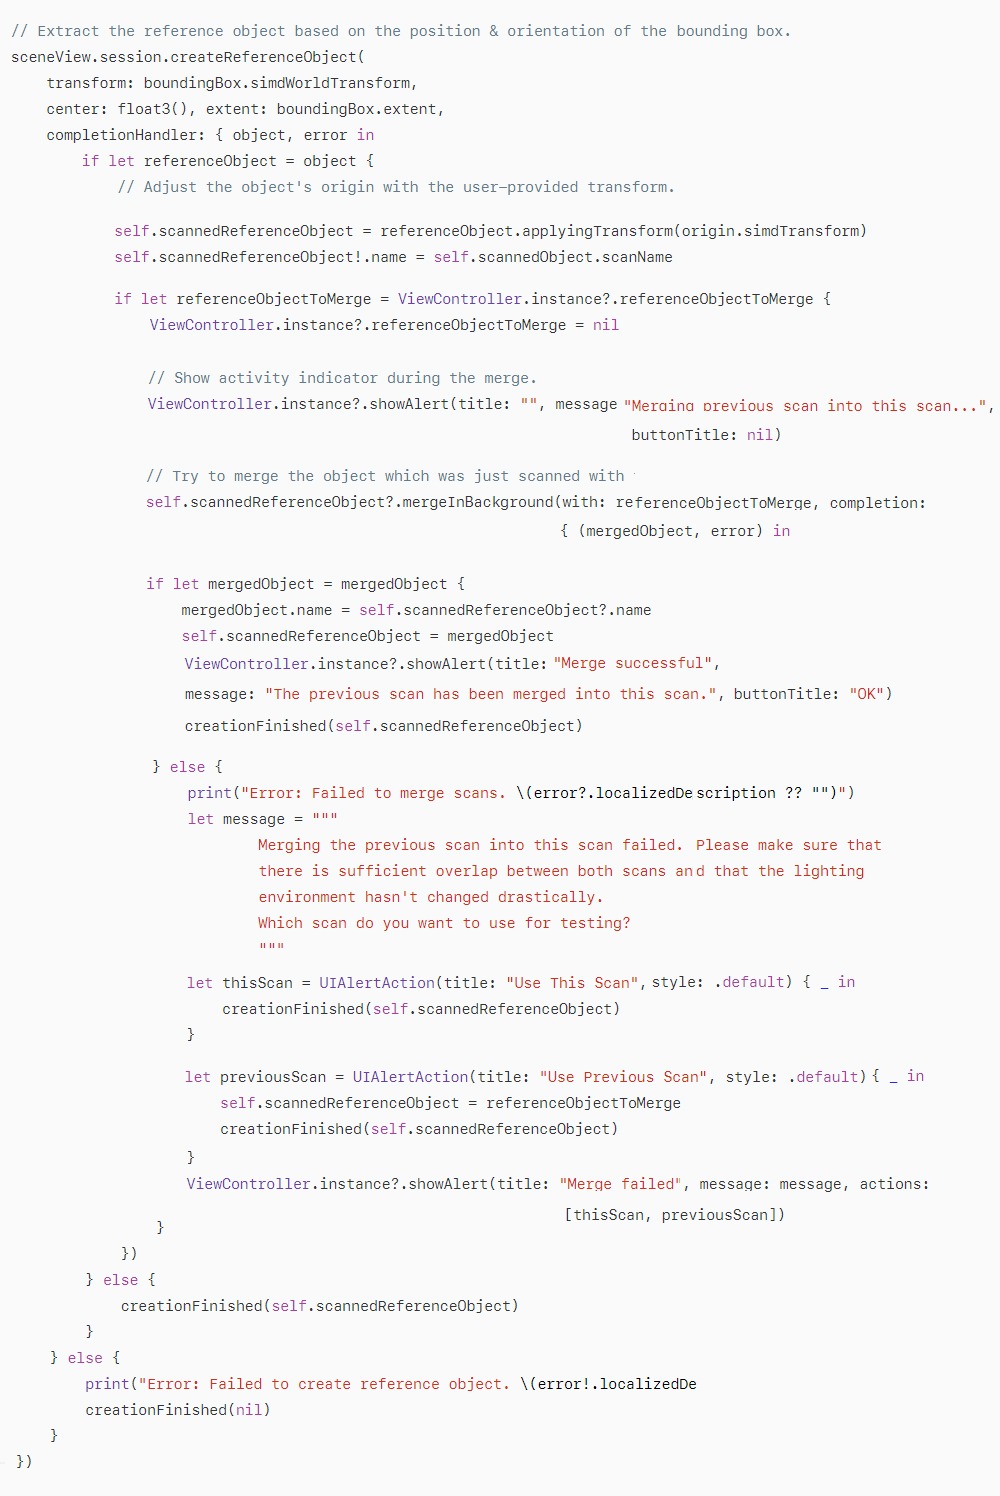
When detecting a reference object, ARKit reports its position based on the origin the reference object defines. If you want to place virtual content that appears to sit on the same surface as the real-world object, make sure the reference object’s origin is placed at the point where the real-world object sits. To adjust the origin after capturing an ARReferenceObject, use the applyingTransform(_:)method.
After you obtain an ARReferenceObject, you can either use it immediately for detection (see “Detect Reference Objects in an AR Experience” above) or save it as an.arobject file for use in later sessions or other ARKit-based apps. To save an object to a file, use the export(to:previewImage:)method. In that method, you can provide a picture of the real-world object for Xcode to use as a preview image.
Reference URL:- developer.apple.com