


Creating an Immersive Music Player with VisionOS and SwiftUI
Apple’s VisionPro operates using VisionOS. Utilize VisionOS and well-known tools and technologies to craft engaging applications and games tailored for spatial computing. Develop innovative apps using SwiftUI to leverage the full potential of immersion that VisionOS offers.
What Does Immersive Space Mean?
Begin with a recognizable window-oriented interface to acquaint users with your material. From this foundation, integrate SwiftUI scene elements unique to VisionOS, like volumes and areas. These elements enable the integration of depth, 3D figures, and enveloping experiences.
Construct the 3D components of your app using RealityKit and Reality Composer Pro, and showcase it through a RealityView. Employ ARKit to blend your material seamlessly with an individual’s environment for a truly immersive feel. Below the image, you can check there are multiple spaces to show your app content not only in a single window.
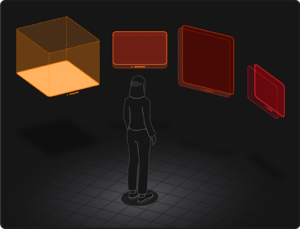
Image Source:- https://developer.apple.com/
We Have Developed An Immersive Music Player App With VisionOS & SwiftUI
We at Technostacks, a leading mobile app development company, has developed a user-friendly music app for VisionOS, tailored for the VisionPro device. This app boasts a sidebar with categories such as Albums, Artists, Songs, and a Popular list. When users choose a particular album, they are presented with a comprehensive list of its songs. The app offers functionalities like playing or pausing tracks, navigating to the next or preceding song, and adjusting playback with a seek bar.
Upon playing a song, users are transported to an immersive interface where a 3D model of a hip-hop dancer moves dynamically on a dance floor. The dance floor’s color alternates randomly, adding to the visual appeal. A 3D label displays the name of the currently playing song. If playback is halted, both the 3D dancing figure and dance floor disappear, but they re-emerge when the song resumes.
Read More:- Placing 3D Objects In Real-World With SwiftUI
For the 3D modeling, we’ve utilized RealityKit and showcased it within RealityView. Our 3D models were crafted with precision in RealityKitComposerPro.
RealityKit
Apple’s RealityKit framework is designed for creating augmented reality (AR) experiences on iOS devices. Its high-level API allows developers to combine 3D graphics, animations, and physical simulations for enriched AR interactions. RealityKit makes AR app creation more accessible by managing the inherent complexities of AR technologies.
RealityView
RealityView is designed to present intricate 3D content in VisionOS apps, especially content generated in Reality Composer Pro using RealityKit. In RealityView, developers work with a structure that adheres to the RealityViewContentProtocol, facilitating the seamless addition or removal of RealityKit entities.
Reality Composer Pro
Reality Composer Pro is a versatile platform catering to both coders and creative professionals. Its intuitive drag-and-drop interface allows users to introduce 3D assets to the scene editor, enabling them to position, scale, rotate, and modify these assets. The tool provides an ideal environment for composing, refining, and previewing content in RealityKit scenes.
Implementation
To begin with, let’s delve into the process of developing an immersive space within a VisionOS app and understand the prerequisites for its creation.
Requirements
- Xcode: Version 15.0+ Beta 3 or higher.
- iOS: Version 17.0 or above.
- macOS: Version 13.4 or newer.
Steps To Create The App
1. Open Xcode.
2. Navigate to File -> Project.
3. In the OS selection at the top, opt for “VisionOS.”
Note:- Refer to the provided screenshot for clarity.
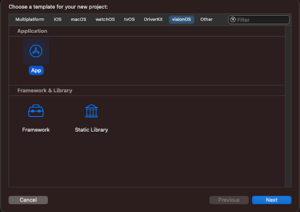
4. In the subsequent screen, you’ll be prompted to input details like the project name and others. A screenshot has been attached for a more detailed view.

A notable feature in this creation process is the option to integrate “Immersive Space.” If you’re inclined to add another immersive realm for content display, this selection is imperative. Immersive space is a tool that enables the display of SwiftUI views unconstrained by any containers. While you can integrate any views in this space, the quintessential choice remains a RealityView for showcasing RealityKit content.
Read More:- Create a 3D Floor Plan of an Interior Room Using RoomPlan
Within this feature, you’re presented with four selection choices:
None:
- A default state without any immersive experience.
Mixed:
- Integrates your digital content with a passthrough. It allows the overlaying of virtual elements within a real-world environment, offering a blended AR experience.
Full:
- This mode focuses solely on your digital content by deactivating the passthrough. It offers comprehensive control over the visual experience, suitable for those instances when you aim to whisk users away to an entirely digital realm.
Progressive:
- This mode selectively replaces the passthrough in specific display areas. It’s ideal for those scenarios where you’d like users to remain anchored in the tangible world while providing a glimpse into a digital one.
In the development of our app, we’ve opted for the “Mixed” immersion style. This choice aligns with our objective to combine digital 3D models with the real-world environment.
By selecting the “Mixed” mode, we can seamlessly integrate our digital content using passthrough. This allows us to overlay virtual 3D models within the actual surroundings, offering users a blended Augmented Reality (AR) experience. This style provides an immersive interface where the digital and physical worlds coalesce, enhancing the overall user experience and making interactions more engaging.
Upon inspecting the SwiftUI file named “VisionMusicAppApp,” you’ll observe two distinct sections: the standard windowGroup and another titled ImmersiveSpace(id: “ImmersiveSpace”). The latter is employed whenever there’s a need to display the immersive space feature within the app.
import SwiftUI

@main
struct VisionMusicAppApp: App {
    // Initiate MusicPlayer state object to used it in every class.
    @StateObject private var musicPlayer = MusicPlayer(songs: demoSongs)
    var body: some Scene {
        WindowGroup {
            ContentView(musicPlayer: musicPlayer)
        }
        ImmersiveSpace(id: "ImmersiveSpace") {
            ImmersiveView(musicPlayer: musicPlayer)
        }
    }
}
Moving forward to our primary “ContentView” file, we have leveraged SwiftUI’s NavigationSplitView. This facilitates a layout featuring a sidebar and its corresponding detailed view. Within the code, you’ll find that the MenuView is presented within the SplitView. By default, the detailed view initializes with the ArtistView.
import SwiftUI

struct ContentView: View {

    @ObservedObject var musicPlayer: MusicPlayer
    var body: some View {
        // This is used SpiltView which is used for spilling your screen with sidebar options and details view.
        NavigationSplitView {
            MenuView(musicPlayer: musicPlayer)
        } detail: {
            ArtistView(musicPlayer: musicPlayer)
        }.background(Color(.clear))
    }
}
In the AlbumView class of VisionOS using SwiftUI, we’ve implemented a grid display to showcase the album list using LazyVGrid. This is particularly useful in the detail view of the navigation split view.
LazyVGrid:
LazyVGrid is ideal for displaying an extensive collection of views in a two-dimensional layout that’s vertically scrollable. The first view supplied to the grid’s content closure appears in the top row of the column on the grid’s leading edge.
LazyVGrid(columns: columns, spacing: 24) {
                ForEach(albums) { album in
                    // On grid list selection send to AlbumArtistSongsView with particular selected album songs with musicPlayer.
                    NavigationLink(destination: AlbumArtistSongsView(filteredSongs: filteredSongs(for: album.title), musicPlayer: musicPlayer))
                    {
                        VStack(alignment: .leading) {
                            AsyncImage(url: URL(string: album.image)) { image in
                                image.resizable()
                            } placeholder: {
                                Rectangle().foregroundStyle(.tertiary)
                            }.aspectRatio(1, contentMode: .fill)
                                .scaledToFill()
                                .cornerRadius(10)

                            Text(album.title)
                                .lineLimit(1)
                            Text(album.subTitle)
                                .foregroundStyle(.tertiary)
                                .lineLimit(1)
                        }
                        .hoverEffect()
                    }
                    .buttonStyle(.plain)
                }
            }
Let’s now delve into how we use openImmersiveSpace to display 3D content.
In the SongListView class, you’ll observe that we’ve defined two @Environment variables: openImmersiveSpace and dismissImmersiveSpace. These are used to initiate and close the immersive space, respectively.
OpenImmersiveSpace:
To access an instance of this structure for a specific environment, use the openImmersiveSpace environment value. Once obtained, you can present a space by directly calling the instance. This direct call is facilitated by the callAsFunction(id:) method that Swift invokes when the instance is called.
In the provided code, when a song from the list is selected, the immersive space is opened using its unique identifier.
struct SongsListView: View {
    let songs: [Song]
    @ObservedObject var musicPlayer: MusicPlayer // Observed music player object which we declared on ContentView()
    @Environment(\.openImmersiveSpace) var openImmersiveSpace
    @Environment(\.dismissImmersiveSpace) var dismissImmersiveSpace
    var body: some View {
        ScrollView {
            // Here design for song listing
            LazyVStack(alignment: .leading) {
                ForEach(songs) { song in
                    // A row design for song detail with SongRow struct
                    SongRow(song: song)
                        .onTapGesture {
                            if !musicPlayer.isImmersiveViewOpen {
                                Task {
                                    await openImmersiveSpace(id: "ImmersiveSpace")
                                    musicPlayer.isImmersiveViewOpen = true
                                }
                            }
                            // click on a particular song here it plays on musicPlayer with its URL
                            if let url = Bundle.main.url(forResource: song.title, withExtension: "mp3") {
                                musicPlayer.play(fileURL: url, song: song)
                            }
                        }
                }
            }
            // A View which is managed to handle song controller
            MusicControllerView(musicPlayer: musicPlayer)
        }
   }
}
To display 3D content in ImmersiveSpace, we employ RealityView. An AnchorEntity called dancingManEntity is created first. We then position it and rotate it forward. Within the immersiveSpaceView body, the RealityView is placed.
struct ImmersiveView: View {

    @State private var inputText = ""
    @ObservedObject var musicPlayer: MusicPlayer
    @State private var refreshTrigger = true
    @State private var realityViewContent: RealityViewContent? = nil

    @State var dancingManEntity: Entity = {
        let headAnchor = AnchorEntity(.head)
        headAnchor.position = [-0.40, -0.35, -1]
        headAnchor.anchoring.trackingMode = .once
        let radians = 30 * Float.pi / 180
        ImmersiveView.rotateEntityAroundYAxis(entity: headAnchor, angle: radians)
        return headAnchor
    }()

    var body: some View {
        RealityView { content, attachments in
            realityViewContent = content

            do {
                let immersiveEntity = try await Entity(named: "Immersive", in: realityKitContentBundle)
                dancingManEntity.addChild(immersiveEntity)
                // await animatePromptText(text: "You are playing: \(musicPlayer.currentSong?.title ?? "")")

            } catch {
                print("Error")
            }
        }
    }
}
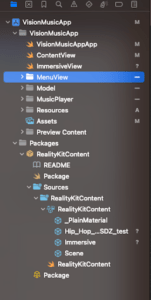
An immersive that was previously created using the realityKitContentBundle can be found in this code. This immersive is located in the Packages folder, a default inclusion when creating an immersiveSpace app.
Related Article:- String Catalog Implementation and Benefits for Localization Accessible in Xcode 15
Examine the image below, which showcases all of my 3D content located in the Packages folder.
The dancing animation will play in a loop using the available animations.
One of the standout features in VisionOS’s SwiftUI implementation is attachments. These allow users to embed SwiftUI content directly into a RealityKit scene. For instance, in our sample app, we demonstrate how to incorporate text labels and views alongside 3D content using attachment views. Importantly, entities can be updated within the update closure whenever the SwiftUI view state undergoes changes.
In the given code, we’ve incorporated a 3D text attachment to display the currently playing song.
var body: some View {
        RealityView { content, attachments in
            realityViewContent = content

            do {
                let immersiveEntity = try await Entity(named: "Immersive", in: realityKitContentBundle)
                dancingManEntity.addChild(immersiveEntity)

                guard let assistant = dancingManEntity.findEntity(named: "assistant") else { return }
                guard let cube = dancingManEntity.findEntity(named: "cube") else { return }
                cube.startRandomColorChangeAnimation()
                guard let idleAnimationResource = assistant.availableAnimations.first else { return }
                assistant.playAnimation(idleAnimationResource.repeat())

                guard let attachmentEntity = attachments.entity(for: "attachment") else { return }
                attachmentEntity.position = SIMD3(0, 0.62, 0)
                let radians = 0 * Float.pi / 180
                ImmersiveView.rotateEntityAroundYAxis(entity: attachmentEntity, angle: radians)
                dancingManEntity.addChild(attachmentEntity)
                inputText = "You are playing: \(musicPlayer.currentSong?.title ?? "")"
                content.add(dancingManEntity)
                // await animatePromptText(text: "You are playing: \(musicPlayer.currentSong?.title ?? "")")

            } catch {
                print("Error")
            }
        } attachments: {
            VStack {
                Text(inputText)
                    .onChange(of: musicPlayer.currentSong, { _, newValue in
                        inputText = "You are playing: \(musicPlayer.currentSong?.title ?? "")"
                    })
                    .frame(maxWidth: 600, alignment: .leading)
                    .font(.extraLargeTitle2)
                    .fontWeight(.regular)
                    .padding(40)
                    .glassBackgroundEffect()
            }
            .task {
                await animatePromptText(text: inputText)
            }
            .tag("attachment")
            .opacity(1)
        }
        .onChange(of: musicPlayer.isCharacterEntityVisible, { _, newValue in
            refreshTrigger.toggle()
            if refreshTrigger {
                realityViewContent?.add(dancingManEntity)
            } else {
                realityViewContent?.remove(dancingManEntity)
            }
        }
    }
You can adjust the position of your 3D model using the DragGesture. In this method, the X and Z positions of the model are altered based on the onChanged callback of the gesture. Similarly, you can implement a rotation gesture using the RotateGesture. For this, you’d set the transform property of the entity within the onChanged callback of the RotateGesture.
.gesture(DragGesture().targetedToAnyEntity().onChanged({ value in
            let currentTime = Date().timeIntervalSince1970
            if currentTime - lastUpdateTime > 0.05 {
                if abs(value.translation.width) > abs(value.translation.height) {
                    // Horizontal movement
                    entityPosition.x += Float(value.translation.width) * dragSpeedFactor
                } else {
                    // Vertical movement
                    entityPosition.z += Float(value.translation.height) * dragSpeedFactor
                }
                dancingManEntity.position = entityPosition
                lastUpdateTime = currentTime
            }
        }))
        .gesture(RotateGesture().targetedToAnyEntity().onChanged({ value in
            let currentTime = Date().timeIntervalSince1970
             if currentTime - lastUpdateTime > 0.05 {
             // Calculate the quaternion for the rotation
             let angle = Float(value.rotation.radians) * rotationSpeedFactor
             let rotationQuaternion = simd_quatf(angle: angle, axis: [0, 1, 0])  // Rotate around the y-axis

             // Combine with the current rotation
             dancingManEntity.transform.rotation = rotationQuaternion * dancingManEntity.transform.rotation

             lastUpdateTime = currentTime
             }
        }))
Related Article:- Agora & Sendbird SDK Integration in iOS Application
Conclusion
In conclusion, our journey into the realm of immersive music experiences with VisionOS, SwiftUI, and 3D objects has opened new dimensions in application development. By seamlessly integrating VisionOS features like ImmersiveSpace and leveraging the power of SwiftUI alongside RealityKit, we’ve crafted a captivating music player that transcends traditional interfaces. The fusion of spatial computing, dynamic 3D models, and interactive SwiftUI elements has redefined the way users engage with music.
As we navigate through the intricacies of code, gestures, and animations, the blog underscores the potential for creating truly immersive and entertaining applications. The harmonious blend of VisionOS and SwiftUI provides developers with a toolkit to elevate user experiences, offering a glimpse into the exciting possibilities at the intersection of technology and creativity.