


How to Submit An App to the App Store?
With the swift pace of digitalization, mobile applications have become a significant part of our day-to-day lives. There are numerous mobile applications accessible for download on the App Store.
However, submitting a mobile application to the App Store is not as straightforward as clicking a push button, moreover it is also not as intricate or multifaceted as it may look either.
You must comprehend that Apple frequently keeps on upgrading its specifications, prevailing policies, and app submission practices to match the digitalization space.
Henceforth, it is imperative that mobile app developers are entirely well-versed and consequently adapt to the current scenario of submitting mobile apps.
As per the report of Statista, In a stringent effort to uphold user privacy and maintain quality standards, the Apple App Store has declined 1.7 million app submissions. A significant portion of these, amounting to 400,000 applications, failed to meet the platform’s rigorous privacy criteria. Furthermore, the App Store’s commitment to authenticity and user protection led to the rejection of over 15,000 apps on the grounds of spam, imitation, or deceptive content. This vigilant curation underscores Apple’s dedication to offering a secure and trustworthy app marketplace for its users. So it is essential to understand the right steps to submit an app to the app store to avoid any kind of rejections.
How To Submit An App To The App Store?
Once your application has been built, you require uploading it to the App Store and open it to your target audiences for quick initial downloading.
You can optimize your mobile apps for the newest version of iOS and easily distribute them in the App Store. Build leveraging Xcode, upgrade your product pages, and submit the app for downloads.
Here is what to do to submit your mobile application for beta testing or publishing an iOS app to the Apple App Store.
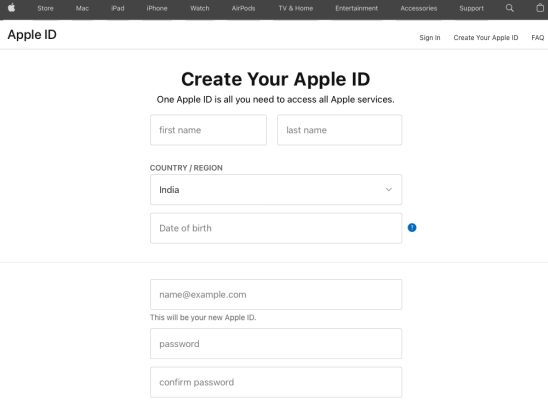
Step 1 – Create an Apple ID, developer account, and App Store connect record for your application
You must create an Apple ID before uploading your mobile application to the app store. By using the Apple ID, you can access all the data and information that Apple offers.
By creating an Apple developer account, you can submit a mobile application. It costs $99 a year for publishing an app for individuals and companies. In addition to the capability to submit mobile apps on the App store, you even get many other advantages with a developer account.

These advantages comprise crafting Safari extensions, evaluating mobile application analytics, and having quick access to leveraging TestFlight and admittance to the beta version of Apple software.
After you craft a developer account, you receive access to App Store Connect, where you can enable your mobile applications with access and management of all the data linked to them.

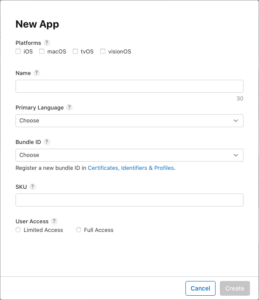
To create an app store connect record, you will require information about the platform, mobile application name, SKU, the primary language, and the bundle ID.
Step 2 – Make the mobile application ready for the submission procedure
Prior to uploading your mobile app to the App Store, you need to go through the application certification process. In this procedure, your application is reviewed as per App Store policies, review, and involved guidelines.
So, it is suggested that you recheck all the documents and follow all the recommended guiding principles. You are also required to ensure that the app you have built is completely error-free.
On the conflicting end, if errors are identified across the mobile app, then there is a high possibility that the mobile app status will lead to a rejection.
It is also important to test the mobile application thoroughly. This testing procedure comprises checking of proper storage, network, and outmoded devices to name some.
You can also take app testing feedback from your family, friends, colleagues, or employees, which further eases the testing process.
So, you can go for guidelines and tactics right in advance to make sure you are moving in the correct direction.
Related Article:- Things You Need To Know Before Building An App
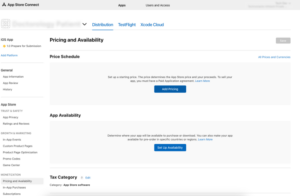
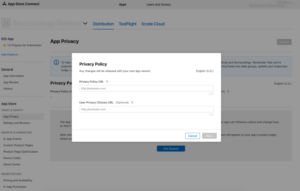
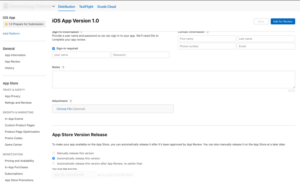
Step 3 – Leverage App store connect to craft an app store listing
The phases that you are required to go through for a precise app store listing comprise the steps below.
- Sign in to the App Store Connect utilizing the created Apple ID.
- Choose My Apps right from the given dashboard.
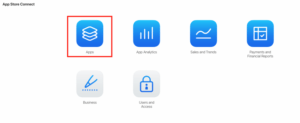
- Click the “+” icon and pick New App from offered choices.

- Choose the application platform.
- Fill in the needed details in the given sections.
- Once you have filled in all the sections, click on the given Create button.
- You are required to choose the details and information about the application, which is obtainable on the left panel.
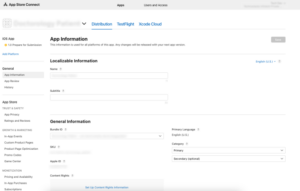
- Furthermore, add the general and localized details applicable to the application which are comprised of fields like category and subtitle.
- Right from the left panel, you are required to choose the availability and pricing choices. Accordingly, the application pricing and other information is required to be stated.
- Next is app privacy where you are obligatory to pass in your privacy policy URL. An online privacy policy generator can help you in this step.
- You are required to pick the submission option accessible in the left pane. Then, from the segment on version release, choose how your mobile app would be released after transitioning the certification procedure.
You will be offered three choices:
Doing Manually:
Straight go to the App Store Connect to release your mobile application.
Automatedly:
- Release the mobile applications instantly after passing the certification process.
Specifying Exact Date:
- Schedule a specific date to release your mobile application.
Related Article:- Creating an Immersive Music Player with VisionOS and SwiftUI
Step 4 – Upload App Store Screenshots and Previews
The subsequent phase to submitting your mobile app right to the App Store is adding previews and screenshots. The App Store offers a choice for visual mobile application marketing by adding screenshots and previews of your application. Pictures and short videos demonstrate the features of your mobile app.
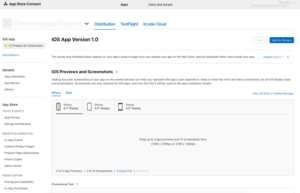
It is suggested that you explore the given screenshots and preview guidelines by the app store so that the probability of the app being accepted is boosted. You can add the screenshots and previews for four sizes. Also, 10 screenshots and 3 App Previews can be utilized for the precise display.
Step 5 – Upload the Mobile App by Leveraging the Xcode
It is suggested that you do not proceed with this step until you finalize that your mobile app is error- or bug-free. The purpose is that if that application is not error-free, then your mobile app can be rejected in the App Store.
So, if you are coming up with a fresh app, then the Xcode 1.0.0 version needs to be well set up. With the latest version, the procedure of mobile app publishing has become simpler.
Formerly, multiple steps and phases were required when it came to publishing and distribution of the mobile app, but currently it can be executed with some clicks.
- Add the involved developer account right to the Xcode.

- Choose Signing & Capabilities from the available choices and check the Automatically manage signing checkbox to sign the program explicitly.
- Pick any of the iOS devices from the list of diverse simulators for publishing and distributing the mobile app.
- Move forward to the Product trailed by Archive to bundle the mobile app. This phase will take its own time, depending on the mobile application size you are dealing with. Once done, please choose the Archive and click the top right distribute app button. Users can easily access all archives created in the process.
- Choose the approach to distribute the mobile application and hit the Next button.
- Pick the destination process for the mobile application from the given choices and hit the Next button.
The mobile application will be skimmed for errors and issues. If no challenge is dedicated, the mobile app uploading procedure will be initiated. The uploading time will rely on the archive size and network assets. The mobile app archived to Xcode will consume time to be explicitly processed by App Store Connect.
Related Article:- Agora & Sendbird SDK Integration in iOS Application
Step 6 – Finally, Submit the Mobile App for Review
This is the last phase of uploading the mobile application to the Apple Store. Hit on “Select a build before you submit your app.” Pick the build that you precisely uploaded by Xcode. Click done and save, then finally submit the mobile app for review.
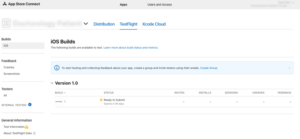
When the Save button is given a hit, the app will be uploaded and submitted for the final review, which can consume some hours to days. Your mobile application’s status is currently “Waiting For Review”.
Check on the mobile application status. In App Store Connect, choose Activity in the top horizontal menu, then check Version History located in the sidebar.
When the mobile app is approved, you will get the approval through an email notification. Your application is now all ready to be downloaded through the App Store. The App Store Connect enables you to keep a view on number of downloads, ratings, feedbacks, sales numbers and more.
Related Article:- Placing 3D Objects in Real-world and Enabling AR with SwiftUI
What are the Further Steps if a Mobile Application is Not Selected?
One must make the essential fixes prior to submitting the mobile application yet again for review. Leverage the option of Resolution Center in App Store Connect to connect with Apple about any queries or related questions. One can even raise the issue and apply if one believes that his mobile application was erroneously excluded.
One of the frequent reasons for non-selection from the Apple App Store is overall performance of the mobile app. So, ensure that your application is error-free and that you have reviewed and tested it meticulously and fixed all probable faults.
Utilizing a bug or error identification tool during beta testing will assist in reducing your mobile app’s likelihoods of being excluded due to performance problems.
One another reason for a release letdown is that your application does not possess valuable functionalities, features, or supportive content. If your application involves a limited niche market, its submissions will not be quick or highlighted by the Apple App Store.
Consequently, prior to publishing your mobile application, do proper research and look at the applications in your domain and match them with your mobile application concepts to check its overall feasibility.
There are even other causes why your mobile app release can get rejected. The application will not get selected for the App Store if it comprises:
- Any of the nasty software
- Broken links or placeholders
- Faulty information access appeals
- Pornography or sexual pictures
- Images of animals being killed
- Content that boosts the unlawful use of deadly weapons
- Inspire consumption of tobacco or illegitimate drugs
Go through App Store Review Guidelines for more details.
Related Article:- Create a 3D Floor Plan of an Interior Room Using RoomPlan
Things To Do Before You Publish An App To The App Store
If you are developing and publishing a mobile app, then the audience of that application must be engrossed. So, create a precise application description, name, marketing texts, previews, and attractive screenshots.
Furthermore, if the mobile application is accessible in a varied series of languages, then the promotional content must be localized.
Apple offers a lot of consideration when it comes to the information of the users. So, the application you are building should fulfill the user privacy guidelines and legal requirements of the nation you are specifically targeting with your mobile app.
If you are making an app that requires access to multiple facets like location or contacts, then you are required to point them to the Apple Review Team. You require to make them believe that all the information is genuine and not stolen by the mobile application.
Another thing that you prerequisite to keep in mind is that the images and text content existing in your mobile app should be approved. If not, then the application might be rejected or directly removed from the app store.
Staying Updated with App Store Submission Guidelines
Apple has specific guidelines that are positioned to provide comprehensive information about mobile application submission requirements.
After frequent time intervals, the App Store keeps on updating and altering the framed requirements. Hence, you must recheck these requirements prior to submission of the mobile app.
With this precise approach, you will ensure that all the significant details and information are included and that your mobile apps are straightforwardly submitted to the App Store.
Key Takeaways
Here we have discussed a step-by-step guide for submitting your app to the Apple app store.
If you precisely follow these steps that have been stated, then you can straightforwardly be able to upload your mobile apps.
Embarking on the hustle of submitting an app may be a struggle at onset, but with proper help, it turns out to be a walk in the park. We know ins and outs of how to work with the Apple Store and we make sure our customers get the best app support.
We at Technostacks, a leading mobile app development company, make the application submission procedure to be very simple, hence your app will not only meet the Apple strict requirements but also it will catch the eyes of the customers in a market crowded with lots of applications.
Find out the essential steps for uploading an app to the app store with our comprehensive guide, and let’s elevate your mobile application to new heights together. You can contact us to learn more and take the first step towards app store success.
FAQs
1. How Much Does it Cost to Put an App on App Store?
For publishing an iOS app on the Apple App Store, you must register and sign in as a developer. The yearly fee for the Apple Developer Program is $99 and the yearly charges for the Apple Developer Enterprise Program is $299.
2. How to Publish an App to the App Store?
Create a developer account and access App Store connect. Craft a new mobile application and fill the details in the product page. Set up the precise roles, certificates, profiles, and identifiers. Then enable uploading of the mobile app build. Evaluate and test your application. Fill in the version details. Select the final release date and deploy the app to iTunes.
3. How to launch an application in the Apple App store?
You cannot launch applications except they have previously been downloaded to your device. To download a mobile application, click the “GET” button for free applications or the price for paid applications to download or purchase the app. When it is readily downloaded, the mobile application will appear in the App Library or on the home screen.
4. How do I add a mobile app to iTunes?
For downloading a mobile app, launch iTunes, choose iTunes Store, alter the type or category on the App Store, pick the application, and then choose Get to add a mobile application to iTunes.
5. How to publish a mobile application directly to the App Store?
The App Store publishing procedure can be briefed in below phases.
- Create an Apple ID and Sign up for a developer program.
- Set up the mobile application for submission.
- Craft a precise listing through App Store Connect.
- Capture screenshots and previews on the App Store.
- Upload the mobile application leveraging Xcode.
- Finally, submit the mobile app to be checked and reviewed by Apple.