


How To Publish An App To Google Play Store?
Google Play Store is the hub of Android apps and there are thousands of apps published daily on it. It’s crucial to understand the steps to submit an app to the Play Store before you plan to launch your app.
Reaching millions of potential users through the Google Play Store is an incredible opportunity to gain recognition and success. But before your app basks in the spotlight, there’s a crucial step: submission. The Google Play Store has a streamlined process to ensure quality and user safety, and navigating it can seem daunting at first. Fear not, aspiring developer! This comprehensive guide will break down the submission process into easy-to-follow steps.
As per the report, Google blocked 2.28 million apps worldwide from being published on its Play Store last year, citing policy violations. The company also banned 333,000 accounts for malware and policy violations. So it is important to understand the proper steps for submitting an app to the play store to avoid app rejection.
We’ll cover everything from setting up your developer account to crafting a compelling store listing, ensuring a smooth launch and propelling your app toward the Google Play Store.
How To Upload An App To Google Play Store?
Let us explore the steps and phases for publishing your android app directly on the Google Play Store.
Step 1 – Step Up a Google Developer Account on the Google Play Console
To successfully publish an Android application on the Google Play Store, you requisite to create a Google developer account right on the Google Play Console. Developers who need to publish an application must pay fees of $25, payable digitally. Please remember that the developer account can take around 48 hours to activate after submission.
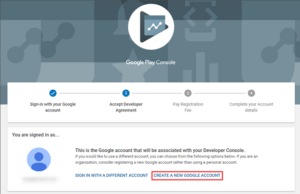
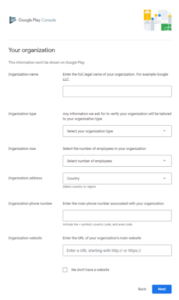
You would have to sign in leveraging a Gmail ID entering the console. After you sign in, the Google Play Console will query whether a developer or business will own the application account. Based on the ownership, you need to enter your elementary details or your business information leading to the payment segment and conclude the account formation.
Also, make sure you fill in the credentials asked while crafting the account.
Related Article:- Most Popular Mobile App Development Frameworks
Step 2 – Move to Setting Up a Google Merchant Account
If the mobile app possesses in-app purchases, you are required to link your developer account with a Google merchant account. If you have a prevailing Google merchant account, you can move forward to Download Reports and choose Financial. Nevertheless, to access this page, you need to craft a Merchant Account.
Click on Set up a merchant account to move forward.
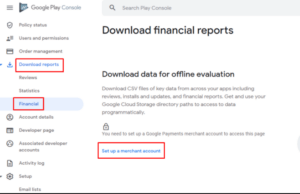
When you set up a new merchant account, it will automatically get linked to your Google Play Console account. This will offer you the direct access of monitoring, managing, and analyzing the application sales and rights for creating the reports.
Step 3 – Create Application
After the merchant account is allied to your Google Play Console, you requisite to create a mobile application. Follow all the explicit steps below to create an application.
- Hit – Menu > All applications
- Choose ‘Create Application’
You now need to fill in the details below:
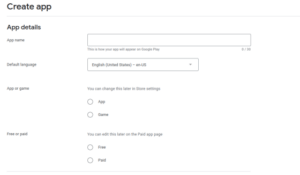
Application Name:
- Enter a 30-character long name, which will be showcased on the Google Play Console. Nevertheless, you can alter the app name afterward.
Set a Default Language:
Set up the application language by using the drop-down menu and set a default mobile app language.
Choose Application or Game:
- State whether you need to upload an application or a game, however, this can be altered afterward using the store settings.
Free or Paid Options:
- Choose whether your application will be accessible free or will need the user to pay for usage. The free or paid segment can even be updated from the paid app page until you publish your application. If you make your app live, you cannot change your application from free to paid version.
After submitting and validating these details, the Google Play Console will query you for confirmation. You must make sure that your mobile application matches the Google-enabled policies of the Developer Program and admits the USA export laws. When you accept the terms and conditions, hit the Create App button.
Related Article:- Top Mobile App Design Tools
Step 4 – Fill in all the details of mobile app listing
Fill out all the required information pertinent to the mobile application listing. When you hit the ‘Create App,’ button the Google Play Console will automatedly take you to a unified dashboard where you must fill the essential information to create and set up your application.
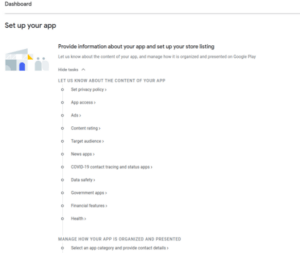
The Google Play Console will further query the following details:
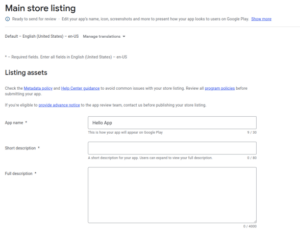
Application Name:
- If you want to change the app name, you can do it here.
Short Description:
- You must enter an 80-character description that defines your app details briefly.
Complete Description:
- This field allows you to describe your mobile app in detail. You can enlarge the word limit to 4000 characters and use keywords to let Google share your application with the applicable target audiences.
After all these details are added to the Google console, you can add the application graphics, app type, and related privacy policy. Use superior-quality images, as all of them will be leveraged.
Please follow the below details:
| Particulars | Specific Details |
|---|---|
| Screenshots | 2 to 8 in numbers. PNG or JPG. The precise ratio should not surpass 2:1 |
| Icon | 512 X 512. PNG. Utmost file size – 1024 KB |
| App type & category | Direct to the Drop down menu and hand-pick app type: game or application. Choose a category. Please rate the content subsequently to uploading your precise APK. |
| Localization | If your application exists in multiple languages, you must state them and add translations of your app’s details to help the users checking your application. |
| Privacy Policies | To enable the application privacy, Google directs adding of a privacy policy when you publish your application. You can complete this later by clicking save draft button. |
| Contact Information | Fill out the contact forms so that users can easily connect with you. |
Now, Click the Save Button.
Related Article:- Different Types of Mobile Apps
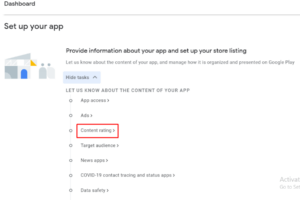
Step 5 – Enable Content Rating
Without enabling the rating of your application’s content, Google will categorize it as an Underrated app and will unquestionably eliminate it from Google Play Store. So, let us avoid that and explore the involved steps to precisely add content rating.
Navigate to the dashboard, set up the application, and choose the Content rating option.
The subsequent dashboard will appear, and you must navigate to the “Start Questionnaire” button; you must directly hit the tab and get initiated.
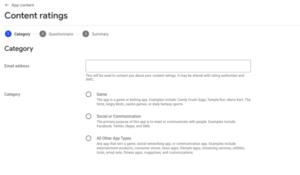
You must further enter details about the application in the content rating segment. This segment is divided into three sub-segments which are:
- Categories
- Questionnaire
- Summary.
In the Category segment, you must enter the Email ID that the users can use to connect with you and the category of the application you are publishing right on the Google Play Store.
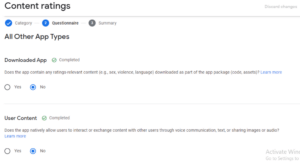
After filling out all the details, click Next and move to the Questionnaire segment.
Further, in the Questionnaire segment, fill in the information and let Google know more about your application to comprehend your audience healthier.
After filling in all the information, you can view the content rating summary and click the ‘Submit’ button to apply the details and changes.
Data Safety
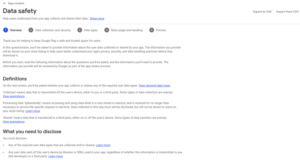
When your app deals with private info like health or money details, it’s super important to follow Google Play’s rules for Data Safety. Make sure you tell your users all about how you collect, use, and protect their data in your privacy policy. It’s a good idea to fill out Google Play’s Data Safety form too. This shows that you’re serious about keeping user data safe.
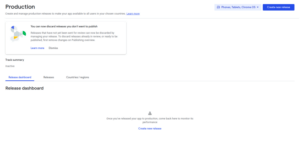
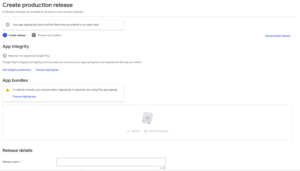
Step 6 – Create and Upload the App to the Google Play Store
Uploading of APK to the Google Play Console is an important phase of the application publishing procedure, where your mobile app is uploaded and submitted to Google to review the details and finally go live.
However, you first need to take a decision for selecting the type of app release – Internal Test (accessible for up to 100 testers that you prefer), Close Test (obtainable to just an explicit number of testers), Production Release (accessible to all the Play store users in your selected nations), or Open Test (obtainable to Google Play testers, and users to connect to the specific tests right from your store listings).
When you decide on the testing approach, you can move to the dashboard and choose “Create a new release. “
After choosing “Create a new release,” you will be redirected to a specific dashboard, where you can move forward to upload the application bundles and the release information.
When you successfully enter all the information, sanction all the details as correct, and take the concluding step of adding the mobile app directly to the platform.
At this point, navigate to the ‘App Releases’ tab and choose ‘Manage Production’ followed by ‘Edit Release’; hit the ‘Review’ button and click the ‘Start rollout to production option.
Then, finally, choose the ‘Confirm’ option and conclude the whole process.
You are done with the fruitful uploading of your application right to the Google Play Store account for free.
After the Google Play app uploading is executed, you must wait for Google to check and accept the mobile app. The Google app approval procedure can consume a few hours or encompass up to 7 days, so it is better to make sure that you are well-prepared for both fruitful publishing of the application and for doing any modifications if essential.
Moving Forward
With these steps completed, your app will be submitted for review by the Google Play Store team. Following their guidelines and providing clear, comprehensive information throughout the process will help expedite approval. After a successful review, your app will be available for download by millions of users worldwide! This guide serves as a roadmap to get you started.
Getting your mobile app into the Google Play Store is a big step for any app creator. At Technostacks, we really get how important this step is. We’re a top mobile app development company, expert at making web and software applications, and we know all the steps to get your app into the store without any trouble. This article shows how much we want to help app creators do well. If you want to know more or have an app ideas to make it in reality, just get in touch with us.